A website user needs to login or register on your web page. So, you need to redirect your customers to two distinct pages. New users will be directed to the Register page and logged out users will be directed to the login page. Further, this tutorial will guide you on how to create WooCommerce Custom Login and Registration Pages.
The WooCommerce My Account page has the woocommerce_my_account shortcode. It contains both Login and Registration web forms. However, you do not want the login form to load every time. Especially, it is not required when you have a landing page or sales page with a specific user registration goal.
Reading further, you will find two shortcodes for Login form and Registration form. However, you need to be aware of new WooCommerce updates. As in whenever the new update comes, you have to update your shortcodes too.
Steps to follow before using the shortcodes
You need woocommerce_my_account shortcode in case of creating Custom Login and Registration Pages. So, this code is required when you want to set the login form and the My Account dashboard active. You wish to keep both these elements open while logged in on the same page.
When you want to have LOGIN + MY ACCOUNT & a separate Registration page, then use the below codes:
- [wc_reg_form_phpsof], use it on the Register page
- [ woocommerce_my_account ], use it on the Login/My Account page
When you want to have separate pages for Login, Registration and My Account, then use the below codes:
- [wc_reg_form_phpsof], use it on the Register page
- [wc_login_form_phpsof], use it on the Login page
- [ woocommerce_my_account ], use it on the My Account page
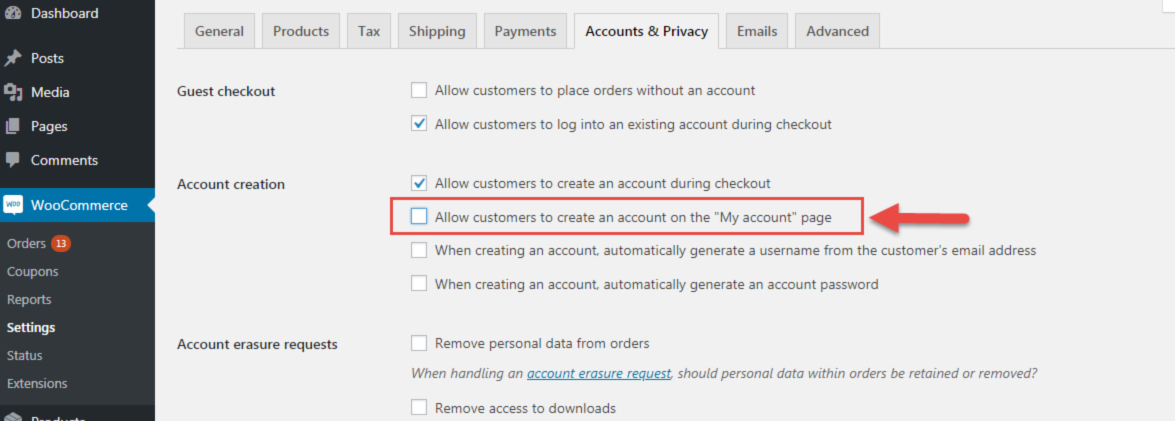
While applying both the codes, make sure that you turn off ‘Allow customers to create an account on the ‘My Account’ page. This option is available in the WooCommerce plugin under the ‘Accounts & Privacy’ option.
Snippet#1 (PHP): Separate WooCommerce Customer Registration
You can implement the below shortcode in your ‘Register’ WordPress page. Doing so, the Register form will start to show up. This step is important to be followed while creating Custom Login and Registration Pages.
add_shortcode( 'wc_reg_form_phpsof', 'phpsof_separate_registration_form' );

function phpsof_separate_registration_form() {
   if ( is_admin() ) return;
   if ( is_user_logged_in() ) return;
   ob_start();

   // NOTE: THE FOLLOWING <FORM></FORM> IS COPIED FROM woocommerce\templates\myaccount\form-login.php
   // IF WOOCOMMERCE RELEASES AN UPDATE TO THAT TEMPLATE, YOU MUST CHANGE THIS ACCORDINGLY

   do_action( 'woocommerce_before_customer_login_form' );

   ?>
      <form method="post" class="woocommerce-form woocommerce-form-register register" <?php do_action( 'woocommerce_register_form_tag' ); ?> >

         <?php do_action( 'woocommerce_register_form_start' ); ?>

         <?php if ( 'no' === get_option( 'woocommerce_registration_generate_username' ) ) : ?>

            <p class="woocommerce-form-row woocommerce-form-row--wide form-row form-row-wide">
               <label for="reg_username"><?php esc_html_e( 'Username', 'woocommerce' ); ?> <span class="required">*</span></label>
               <input type="text" class="woocommerce-Input woocommerce-Input--text input-text" name="username" id="reg_username" autocomplete="username" value="<?php echo ( ! empty( $_POST['username'] ) ) ? esc_attr( wp_unslash( $_POST['username'] ) ) : ''; ?>" /><?php // @codingStandardsIgnoreLine ?>
            </p>

         <?php endif; ?>

         <p class="woocommerce-form-row woocommerce-form-row--wide form-row form-row-wide">
            <label for="reg_email"><?php esc_html_e( 'Email address', 'woocommerce' ); ?> <span class="required">*</span></label>
            <input type="email" class="woocommerce-Input woocommerce-Input--text input-text" name="email" id="reg_email" autocomplete="email" value="<?php echo ( ! empty( $_POST['email'] ) ) ? esc_attr( wp_unslash( $_POST['email'] ) ) : ''; ?>" /><?php // @codingStandardsIgnoreLine ?>
         </p>

         <?php if ( 'no' === get_option( 'woocommerce_registration_generate_password' ) ) : ?>

            <p class="woocommerce-form-row woocommerce-form-row--wide form-row form-row-wide">
               <label for="reg_password"><?php esc_html_e( 'Password', 'woocommerce' ); ?> <span class="required">*</span></label>
               <input type="password" class="woocommerce-Input woocommerce-Input--text input-text" name="password" id="reg_password" autocomplete="new-password" />
            </p>

         <?php else : ?>

            <p><?php esc_html_e( 'A password will be sent to your email address.', 'woocommerce' ); ?></p>

         <?php endif; ?>

         <?php do_action( 'woocommerce_register_form' ); ?>

         <p class="woocommerce-FormRow form-row">
            <?php wp_nonce_field( 'woocommerce-register', 'woocommerce-register-nonce' ); ?>
            <button type="submit" class="woocommerce-Button woocommerce-button button woocommerce-form-register__submit" name="register" value="<?php esc_attr_e( 'Register', 'woocommerce' ); ?>"><?php esc_html_e( 'Register', 'woocommerce' ); ?></button>
         </p>

         <?php do_action( 'woocommerce_register_form_end' ); ?>

      </form>

   <?php

   return ob_get_clean();
}
Snippet#2 (PHP): Separate WooCommerce Login
Firstly, you can use the below shortcode i.e. woocommerce_my_account. Otherwise, you can also use this shortcode ([wc_login_form_phpsof]) for a new login page.
add_shortcode( 'wc_login_form_phpsof', 'phpsof_separate_login_form' );

function phpsof_separate_login_form() {
   if ( is_admin() ) return;
   if ( is_user_logged_in() ) return;
   ob_start();
   woocommerce_login_form( array( 'redirect' => 'https://custom.url' ) );
   return ob_get_clean();
}
Where to add the snippet?
You can put the PHP snippets in either of these two places. One way is to put them in your child theme functions.php file (delete “?>”, in case you have it there). In another way, you need to put CSS in your child theme style.css file. This is how you create Custom Login and Registration Pages.
Also Read, Build Popup contact form using jQuery and PHP
Add Datatable Custom Filter Dropdown Server-side processing with PHP